
After installing Ubuntu for Raspberry Pi onto the microSD, insert the microSD into the Raspberry Pi and power on the Raspberry Pi. Before powering on the Raspberry Pi, connect a keyboard, mouse, and display to the Raspberry Pi.
After powering on the Raspberry Pi, when Ubuntu starts up, you will set the language, keyboard language, time zone, and user and Raspberry Pi hostnames. The installation process will then begin, and when it is complete, the login screen will appear. Enter the username and password you set to log in. After logging in, the initial settings window will appear, so follow the messages and make the appropriate selections for you. This completes the installation process. Next, prepare the environment before installing INDI.
To update Ubuntu to the latest version, launch the Terminal app. Click the mark at the bottom left of the screen to display a list of apps. A list of apps will appear, so click the Terminal app to launch it.
Once the Terminal app is up and running, enter sudo apt update in the Terminal command prompt and execute it (press the return key). If you are asked for a password, enter your login password. Once finished, enter sudo apt upgrade and execute it. The package download will begin, and installation will begin after download.
Next, edit the Ubuntu startup configuration file. In the Terminal command prompt, enter cd /boot/firmware to change the current directory. Enter vi cmdline.txt to open cmdline.txt. Add swiotlb=65536 to the end of the file contents and save it. If you are using the Raspberry Pi's UART to connect to the GPS, enter vi config.txt, add enable_uart=1 to the end of the file, and save it.
After rebooting and logging in, launch the Settings app and click "System" from the list of settings displayed on the left side of the app window, then click "Language & Localization." Furthermore, click "Manage Installed Languages" to install and set the languages you want to use. Once you have finished downloading and installing software, please log out.
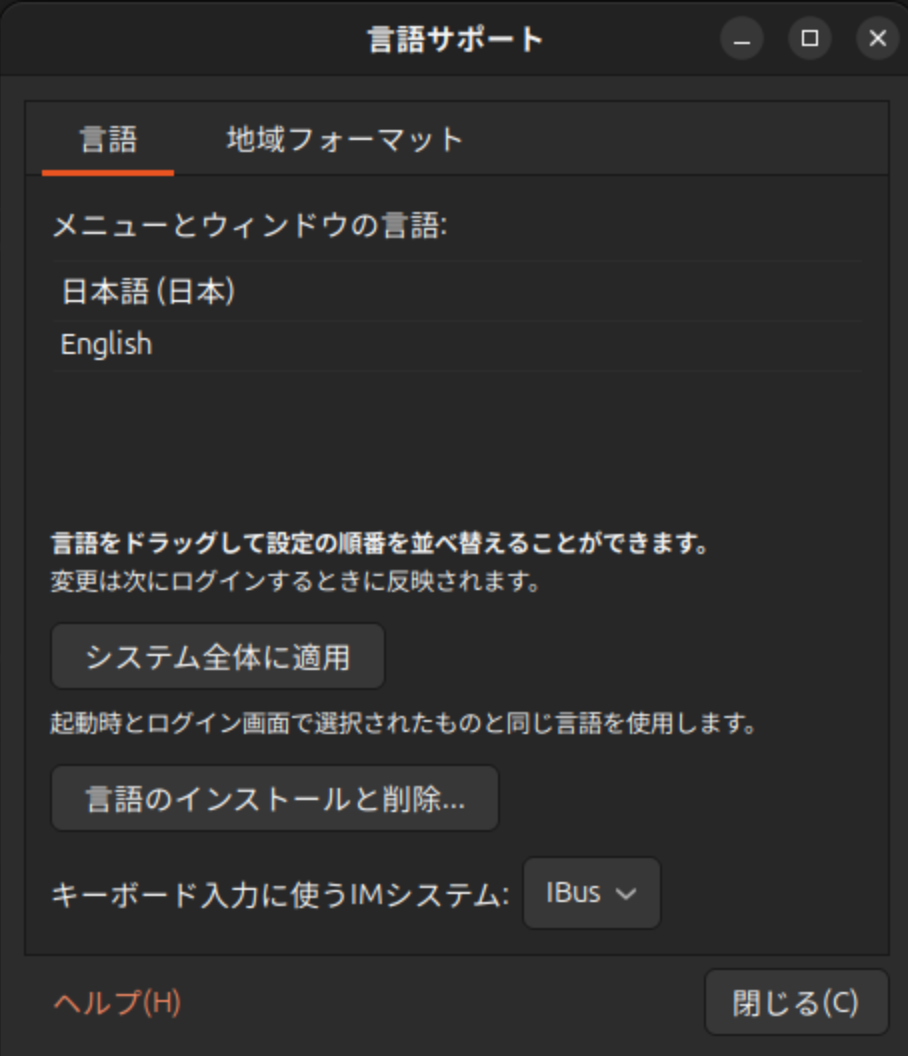
When you log in again, the language will be changed to the one you set. Next, configure ntp and GPS.
Start the Terminal app and enter sudo apt install chrony gpsd gpsd-clients python3-pip in the command prompt. After the packages are installed, edit the gpsd and chrony configuration files. Enter cd /etc/default to change the current directory. Next, enter vi gpsd to open the gpsd file. If you are connecting the GPS receiver via USB, enter /dev/ttyUSBX in double quotes in the DEVICES="" section. Note that X is the device file number of the USB to which the GPS receiver is connected. It can be 0, 1, 2... If you are connecting to the Raspberry Pi's UART, enter /dev/ttyAMA0. Enter -b -n in the GPSD_OPTIONS section. Change the USBAUTO section to false only if you are connecting to the UART. After making these modifications, save and close the file. Next, enter sudo systemctl start gpsd. If no errors occur, enter sudo systemctl enable gpsd to set gpsd to run automatically even after rebooting.
Next, configure chrony. Enter cd /etc/chrony to change the current directory. Enter vi chrony.conf to open the chrony.conf file. Comment out all lines that contain pool ntp.ubuntu.com ... by entering # at the beginning of the line. Enter pool ntp.nict.jp iburst maxsources 4 after the last pool line that was commented out. Then, when synchronizing the time using the date information from the GPS receiver, add refclock SHM 0 refid GPS precision 1e-1 offset 0.9999 delay 0.2 after the last line of chrony.conf, save, and close the file. Next, enter sudo systemctl restart chrony to restart chrony. If no errors occur, restart Ubuntu.
Now you are ready to install INDI.